Sub Panel Installation for 200amp Electrical Panels When it comes to upgrading or expanding your home’s electrical system, few projects are as impactful as a sub panel installation for 200amp electrical panels. Whether you’re adding a new wing to your home, setting up a workshop in your garage, or simply need more circuit capacity to power modern appliances, a sub panel can be a game-changer. As someone who’s spent years working with electricians across the United States, I’ve seen firsthand how a well-installed sub panel can make a home safer, more efficient, and ready for today’s electrical demands. In this article, I’ll walk you through everything you need to know about sub panel installation for 200amp electrical panels, from why you might need one to how to find the right local electrician for the job.
This guide is designed to be practical, detailed, and grounded in real-world experience. I’ll cover the technical aspects, safety considerations, cost factors, and how to navigate local regulations, all while keeping things straightforward and human. Let’s dive in.
What Is a Sub Panel and Why Do You Need One?
A sub panel, sometimes called a secondary panel or breaker box, is essentially a smaller version of your home’s main electrical panel. It’s connected to the main panel and distributes power to specific areas of your home or property, like a basement, garage, or new addition. Think of it as a branch office for your electrical system—it takes the load off the main panel and gives you more flexibility to manage circuits in a particular area.
Why Install a Sub Panel for a 200amp Electrical Panel?
A 200amp main electrical panel is the standard for most modern homes in the United States, capable of handling the electrical demands of everything from HVAC systems to electric vehicle chargers. But even a 200amp panel can run out of space for new circuits, especially if you’re adding high-powered appliances or expanding your home. Here’s why a sub panel installation for 200amp electrical panels makes sense:
- Increased Circuit Capacity: If your main panel is full, a sub panel adds more breaker slots for new circuits without needing to upgrade the entire electrical service.
- Localized Power Distribution: Sub panels are perfect for areas far from the main panel, like a detached garage or workshop, reducing the need for long, costly wiring runs.
- Safety and Load Management: By distributing power more efficiently, a sub panel can prevent overloading your main panel, reducing the risk of tripped breakers or electrical fires.
- Future-Proofing: Adding a sub panel prepares your home for future electrical needs, like new appliances, home offices, or even an electric vehicle charging station.
- Convenience: A sub panel in a specific area (like a basement) makes it easier to control and troubleshoot electrical issues without trekking to the main panel.
For example, I recently spoke with a homeowner in Ohio who wanted to convert their garage into a woodworking shop. Their 200amp main panel was already maxed out with circuits for the house, including an electric range and a new HVAC system. By installing a sub panel for their 200amp electrical panel in the garage, they were able to add dedicated circuits for power tools, lighting, and a dust collection system without overloading the main panel.
Understanding 200amp Electrical Panels
Before we dive deeper into sub panel installation, let’s talk about the 200amp electrical panel itself. This is the heart of your home’s electrical system, responsible for distributing power from the utility company to every circuit in your house. A 200amp panel is designed to handle up to 200 amps of electrical current, which is sufficient for most homes, even those with high-energy appliances like electric ovens, air conditioners, or EV chargers.
Key Features of a 200amp Electrical Panel
- Amperage Capacity: A 200amp panel can handle up to 48,000 watts of power (at 240 volts), making it ideal for modern homes with significant electrical loads.
- Breaker Slots: Most 200amp panels have 30–40 breaker slots, allowing for multiple circuits to power different areas or appliances.
- Main Breaker: The main breaker controls the entire panel’s power supply and can shut off all electricity to the house if needed.
- Compatibility: A 200amp panel can support a sub panel, provided the sub panel’s amperage doesn’t exceed the main panel’s capacity (more on this later).
If your home was built after 2015, it likely already has a 200amp panel, as this has been the standard for new construction in the U.S. Older homes, however, may still have 60amp or 100amp panels, which often need upgrading before a sub panel can be installed. If you’re unsure about your panel’s capacity, a licensed electrician can perform a load calculation to determine if a sub panel installation for a 200amp electrical panel is feasible.
When Should You Consider a Sub Panel Installation?
Not every home needs a sub panel, but there are specific scenarios where a sub panel installation for 200amp electrical panels is the best solution. Here are some common situations:
- Home Additions or Remodels: If you’re adding a new room, basement apartment, or guest house, a sub panel can provide dedicated power without overloading the main panel.
- High-Powered Appliances: Large appliances like electric vehicle chargers, hot tubs, or industrial-grade power tools often require dedicated circuits that a sub panel can easily accommodate.
- Detached Structures: Garages, workshops, or sheds far from the main house benefit from a sub panel to avoid long wiring runs and voltage drops.
- Frequent Breaker Trips: If your main panel is constantly tripping breakers due to overload, a sub panel can redistribute the load more effectively.
- Older Homes with Modern Needs: Homes built decades ago weren’t designed for today’s electrical demands, like smart devices, home theaters, or electric vehicles. A sub panel can bridge that gap.
For instance, a family in Texas I worked with was struggling with frequent breaker trips in their 1980s home. Their 200amp panel was sufficient, but it was fully loaded with circuits for modern appliances. By installing a 100amp sub panel in their newly finished basement, they added circuits for a home theater, wet bar, and extra lighting, all while keeping the main panel stable.
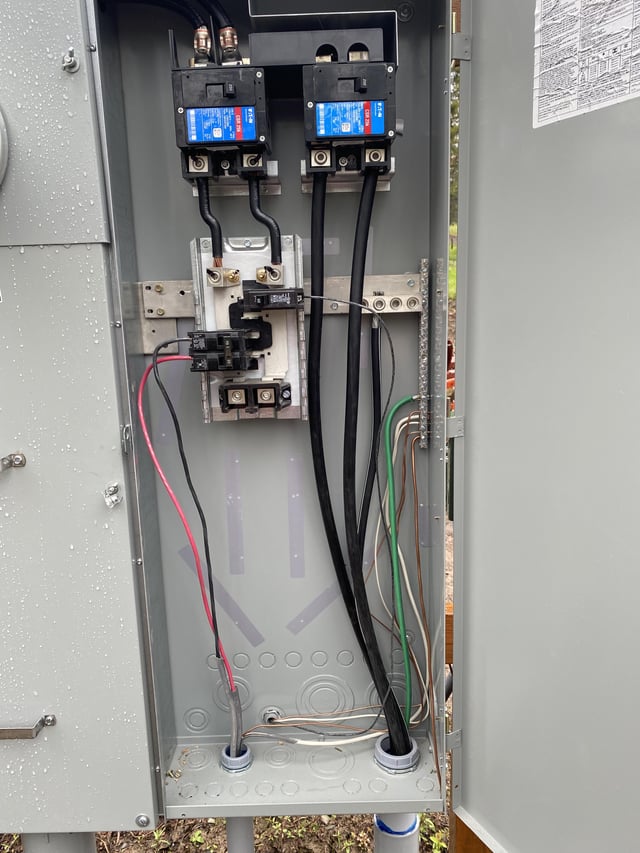
The Sub Panel Installation Process for 200amp Electrical Panels
Installing a sub panel is a complex job that requires careful planning, technical expertise, and adherence to local building codes. Here’s a step-by-step breakdown of what a sub panel installation for 200amp electrical panels typically involves:
1. Assessing Your Electrical Needs
Before any work begins, a licensed electrician will assess your home’s electrical system. This includes:
- Load Calculation: The electrician will calculate the total electrical load of your home to ensure the main 200amp panel can support a sub panel. The sub panel’s amperage (e.g., 50amp, 100amp, or 125amp) must not exceed 50% of the main panel’s capacity to stay within safe limits.
- Circuit Requirements: Determine how many circuits the sub panel needs to support. For example, a garage sub panel might need circuits for lighting, outlets, and a welder, while a basement sub panel might need circuits for a sump pump, lighting, and a mini fridge.
- Location Planning: The electrician will choose a location for the sub panel that complies with National Electrical Code (NEC) requirements, such as 3 feet of clearance in front of the panel and a height of 4–6 feet off the ground.
2. Obtaining Permits
Most municipalities in the U.S. require permits for sub panel installations to ensure the work meets local building codes. The electrician will typically handle the permit application, which costs $50–$300 depending on the area. Skipping this step can lead to fines or issues when selling your home, so it’s not worth cutting corners.
3. Selecting the Sub Panel
Sub panels come in various sizes, typically ranging from 50amp to 125amp for residential use. The electrician will choose a sub panel that matches your needs and is compatible with your 200amp main panel. Common brands include Square D, Eaton, and Siemens, known for their reliability and code compliance.
4. Running the Feeder Cable
The sub panel connects to the main panel via a feeder cable, which carries power from the main breaker to the sub panel. The cable size depends on the sub panel’s amperage and distance from the main panel:
- For a 100amp sub panel: 4/0 aluminum or 2/0 copper wire is typically sufficient.
- For a 125amp sub panel: Larger wire, like 250 kcmil aluminum, may be required to account for voltage drops over long distances.
If the sub panel is in a detached structure, like a garage, the electrician may need to trench underground to run the cable, adding $6–$13.50 per foot to the cost.
5. Installing the Sub Panel
The electrician mounts the sub panel in the chosen location, ensuring it’s secure and accessible. They’ll connect the feeder cable to a double-pole breaker in the main panel and to the sub panel’s lugs or main breaker (if required). For sub panels in separate buildings with more than six circuits, a main disconnect switch is often required by code.
6. Wiring and Grounding
The electrician will install circuits in the sub panel, connecting them to breakers and grounding the system properly. Grounding is critical to prevent electrical shocks or fires, especially in areas like basements or garages where moisture might be present. GFCI (Ground Fault Circuit Interrupter) breakers may be required for certain circuits, like those in bathrooms or kitchens, adding $10–$100 per breaker to the cost.
7. Testing and Inspection
Once the sub panel is installed, the electrician tests the system to ensure all circuits are functioning correctly and safely. A local building inspector will review the work to confirm it meets NEC and local codes. Only after passing inspection can the sub panel be fully energized.
8. Final Connection
The electrician coordinates with the utility company to reconnect power if the main service was disconnected during installation. This step ensures the sub panel is fully integrated into your home’s electrical system.
This process typically takes 4–8 hours, depending on the complexity of the installation and the distance between the main panel and sub panel.
Costs of Sub Panel Installation for 200amp Electrical Panels
One of the first questions homeowners ask is, “How much will a sub panel installation for 200amp electrical panels cost?” The answer depends on several factors, but here’s a detailed breakdown based on industry data and my experience working with electricians across the U.S.
Average Costs
- Sub Panel Unit: $20–$350, depending on the amperage and brand. A 100amp sub panel typically costs $50–$150, while a 125amp panel may cost $100–$350.
- Labor: Electricians charge $50–$100 per hour, and sub panel installation takes 4–8 hours. Expect labor costs of $200–$800 for a straightforward job.
- Feeder Cable and Wiring: $7–$10 per linear foot for wiring, plus $111–$137 for connectors, fittings, and junction boxes. Longer runs or underground trenching can significantly increase costs.
- Permits: $50–$300, depending on local regulations.
- Additional Features: GFCI or AFCI (Arc Fault Circuit Interrupter) breakers add $10–$100 each. Surge protection or other specialty features can add $100–$500.
- Total Cost: The average cost for a sub panel installation for 200amp electrical panels ranges from $400–$1,750, with most projects falling around $1,200.
Factors That Affect Costs
- Sub Panel Size: A 50amp sub panel is cheaper than a 125amp one, both in terms of the unit and the wiring required.
- Distance from Main Panel: The farther the sub panel is from the main panel, the more wiring and labor are needed. For example, a sub panel in a detached garage 100 feet away will cost more than one in a basement 10 feet from the main panel.
- Complexity of Installation: Running wires through walls, ceilings, or underground adds time and cost. If drywall needs to be removed and repaired, expect an additional $60–$100 per hour for a handyperson.
- Electrician’s Experience: Master electricians may charge higher rates ($75–$150/hour) than journeyman electricians ($50–$100/hour), but their expertise can ensure a safer, code-compliant installation.
- Local Labor Rates: Costs vary by region. For example, electricians in urban areas like San Francisco or New York City may charge more than those in rural areas like Iowa or Montana.
- Upgrades to Existing System: If your 200amp main panel or wiring is outdated, additional upgrades (like replacing old wiring or a meter box) can add $600–$2,200 to the project.
Cost-Saving Tips
- Get Multiple Quotes: Contact 2–3 licensed electricians for estimates to find the best value. Be upfront about getting multiple quotes to encourage competitive pricing.
- Schedule During Off-Season: Electricians may offer lower rates during winter months when construction slows down.
- Keep the Sub Panel Close to the Main Panel: Minimizing wiring distance reduces material and labor costs.
- Plan for Future Needs: Install a sub panel with enough breaker slots to accommodate future circuits, avoiding the need for additional upgrades later.
For example, a homeowner in Albuquerque, NM, shared with me that they saved nearly $500 by scheduling their sub panel installation in January and choosing a location just 15 feet from the main panel. Their total cost was $1,100 for a 100amp sub panel, including permits and labor.
Choosing the Right Electrician for Sub Panel Installation
A sub panel installation for 200amp electrical panels is not a DIY project. Working with high-voltage electricity is dangerous and requires specialized training, tools, and knowledge of local codes. Here’s how to find a qualified electrician to ensure a safe, reliable installation:
1. Look for Licensing and Insurance
Always hire a licensed electrician who is bonded and insured. Licensing ensures they’ve met state requirements for training and expertise, while insurance protects you from liability if something goes wrong. Ask to see their license and proof of insurance before work begins.
2. Check Experience and Specialization
Not all electricians are equal. Look for someone with specific experience in sub panel installation for 200amp electrical panels. Master electricians or electrical contractors are often the best choice for complex jobs, as they can handle permits, inspections, and coordination with utility companies.
3. Read Reviews and Ask for References
Check online reviews on platforms like Yelp, Google, or Angie’s List to see what other customers say about the electrician’s work. Ask for references from past clients who had similar sub panel installations. A reputable electrician will be happy to provide this information.
4. Verify Code Compliance
A good electrician will know the National Electrical Code (NEC) and local building codes inside out. They’ll ensure the sub panel installation meets all safety standards, including proper grounding, clearance requirements, and breaker sizing.
5. Get a Detailed Quote
Ask for a written estimate that breaks down labor, materials, permits, and any additional costs. A detailed quote helps you avoid surprises and ensures the electrician is transparent about pricing.
6. Ask About Warranties
Reputable electricians often offer warranties on their work, typically 1–5 years. This covers any issues with the installation, giving you peace of mind.
I once worked with a family in Colorado who hired an unlicensed contractor to save money on a sub panel installation. The work failed inspection due to improper grounding, and they ended up paying a licensed electrician to fix it, doubling their costs. Always prioritize quality and safety over cutting corners.
Safety Considerations for Sub Panel Installation
Safety is paramount when installing a sub panel for a 200amp electrical panel. Electrical work carries risks of shock, fire, or even death if not done correctly. Here are key safety considerations:
- Hire a Professional: Only a licensed electrician should perform sub panel installations. DIY attempts can lead to serious injury or code violations.
- Proper Grounding: The sub panel must be properly grounded to prevent electrical shocks. This is especially important in areas prone to moisture, like basements or outdoor structures.
- NEC Compliance: The installation must meet NEC standards, such as 3 feet of clearance in front of the panel, a 4–6 foot height, and proper labeling of circuits.
- GFCI and AFCI Breakers: Use GFCI breakers for circuits in wet areas (e.g., bathrooms, kitchens) and AFCI breakers for living areas to prevent electrical fires.
- Utility Coordination: The electrician must coordinate with the utility company to disconnect power during installation, ensuring no one is exposed to live wires.
- Regular Maintenance: Schedule periodic inspections to check for wear, corrosion, or loose connections in the sub panel.
A licensed electrician will handle these safety measures, but it’s good to understand them so you can ask informed questions during the process.
Local Regulations and Permits
Electrical work in the United States is heavily regulated to ensure safety and reliability. Sub panel installation for 200amp electrical panels requires permits in most municipalities, and the work must comply with the National Electrical Code (NEC) and local building codes. Here’s what you need to know:
- Permits: Expect to pay $50–$300 for a permit, which the electrician typically obtains. The permit ensures the work is inspected and meets safety standards.
- NEC Requirements: The NEC sets standards for panel clearance, grounding, and breaker sizing. For example, sub panels in separate buildings with more than six circuits require a disconnect switch.
- Local Variations: Building codes vary by city and state. For example, some areas require GFCI protection for all garage circuits, while others don’t. Your electrician should be familiar with local requirements.
- Inspections: After installation, a building inspector will check the sub panel to ensure it’s safe and code-compliant. Failing an inspection can delay the project and add costs for corrections.
Before hiring an electrician, ask how they handle permits and inspections. A good electrician will take care of these details, saving you time and hassle.
Common Mistakes to Avoid
Even with a licensed electrician, sub panel installations can go wrong if certain pitfalls aren’t avoided. Here are common mistakes and how to steer clear of them:
- Undersizing the Sub Panel: Choosing a sub panel that’s too small (e.g., 50amp when you need 100amp) limits future expansion. Plan for current and future needs.
- Ignoring Load Calculations: Overloading the main 200amp panel by adding a sub panel without proper load calculations can cause breaker trips or safety hazards.
- Improper Wiring: Using undersized or incorrect wiring can lead to voltage drops, overheating, or fires. Always use the correct wire size for the sub panel’s amperage.
- Skipping Permits: Failing to obtain permits can result in fines or issues when selling your home. Always ensure the electrician pulls the necessary permits.
- Poor Location Choice: Installing the sub panel in a cramped or inaccessible area violates NEC codes and makes maintenance difficult. Choose a spacious, accessible location.
- Hiring an Unlicensed Electrician: Unlicensed contractors may cut corners, leading to unsafe installations or failed inspections. Always verify licensing and insurance.
By discussing these potential issues with your electrician upfront, you can ensure a smooth, safe installation.
Benefits of a Sub Panel Installation for 200amp Electrical Panels
Investing in a sub panel installation for 200amp electrical panels offers several long-term benefits:
- Enhanced Safety: Properly installed sub panels reduce the risk of overloaded circuits, electrical fires, and shocks.
- Increased Home Value: A modern, code-compliant electrical system with a sub panel can make your home more attractive to buyers.
- Flexibility: Sub panels allow you to add circuits for new appliances or areas without rewiring the entire house.
- Energy Efficiency: By distributing power more effectively, sub panels can reduce strain on the main panel, potentially lowering energy costs.
- Convenience: Having a sub panel in a specific area (like a garage or basement) makes it easier to manage and troubleshoot electrical issues.
For example, a homeowner in North Carolina told me their sub panel installation not only powered their new EV charger but also increased their home’s appraisal value by $5,000, as it showed the electrical system was ready for modern demands.
Real-World Examples of Sub Panel Installations
To give you a better sense of how sub panel installations work in practice, here are a few real-world scenarios based on my experience working with homeowners and electricians:
Case Study 1: Garage Workshop in Colorado
A homeowner in Fort Collins wanted to convert their detached garage into a woodworking shop with heavy-duty tools. Their 200amp main panel was in the house, 50 feet away, and already had 30 circuits. The electrician installed a 100amp sub panel in the garage, running 4/0 aluminum feeder cable underground. The sub panel supported circuits for a table saw, dust collector, lighting, and outlets. The total cost was $1,500, including permits and trenching, and the installation passed inspection without issues.
Case Study 2: Basement Renovation in Ohio
A family in Cincinnati renovated their basement into a home theater and guest suite. Their 200amp main panel was full, so the electrician installed a 125amp sub panel in the basement, just 10 feet from the main panel. The sub panel powered circuits for a projector, sound system, wet bar, and lighting. The project cost $1,200, including GFCI breakers for the wet bar, and took 6 hours to complete.
Case Study 3: EV Charger in California
A homeowner in San Francisco needed a dedicated circuit for a Level 2 EV charger in their garage. The electrician installed a 50amp sub panel to handle the charger and additional garage outlets. The close proximity to the main panel (15 feet) kept wiring costs low, and the total project cost was $900. The sub panel also left room for future circuits, like a potential hot tub.
These examples show how sub panel installations can be tailored to specific needs, budgets, and home layouts.
Maintenance and Upkeep for Sub Panels
Once your sub panel is installed, regular maintenance is key to ensuring it operates safely and efficiently. Here are some tips:
- Annual Inspections: Have a licensed electrician check the sub panel every 1–2 years for signs of wear, corrosion, or loose connections.
- Label Circuits Clearly: Properly labeled breakers make it easier to troubleshoot issues or add new circuits later.
- Watch for Warning Signs: Flickering lights, frequent breaker trips, or burning smells are signs of electrical issues. Call an electrician immediately if you notice these.
- Keep the Area Clear: Ensure the sub panel has 3 feet of clearance in front and is free from clutter to comply with NEC codes and allow easy access.
- Upgrade as Needed: If your electrical needs change (e.g., adding a new appliance), consult an electrician to ensure the sub panel can handle the additional load.
Regular maintenance can extend the life of your sub panel and prevent costly repairs down the line.
Frequently Asked Questions About Sub Panel Installation
Here are answers to some common questions homeowners have about sub panel installation for 200amp electrical panels:
Q: Can I install a sub panel myself?
A: No, sub panel installation is not a DIY project. It involves high-voltage electricity and complex wiring, posing risks of shock, fire, or code violations. Always hire a licensed electrician.
Q: How big should my sub panel be?
A: The size depends on your electrical needs. A 50amp sub panel is sufficient for basic lighting and outlets, while a 100amp or 125amp sub panel can handle larger appliances or multiple circuits. An electrician can perform a load calculation to determine the right size.
Q: How far can a sub panel be from the main panel?
A: There’s no strict limit, but longer distances require thicker cables to prevent voltage drops. For example, a sub panel 100 feet away may need 250 kcmil aluminum wire instead of 4/0.
Q: Do I need a main breaker in the sub panel?
A: Not always. Sub panels with fewer than six circuits in the same building as the main panel typically don’t need a main breaker. However, sub panels in separate buildings or with more than six circuits require a disconnect switch.
Q: How long does installation take?
A: Most installations take 4–8 hours, depending on the distance, number of circuits, and complexity.
Finding Local Electricians for Sub Panel Installation
Finding a reliable electrician for a sub panel installation for 200amp electrical panels can feel overwhelming, especially with so many options. Here’s how to narrow it down:
- Use Online Directories: Platforms like Yelp, Angie’s List, or HomeAdvisor list licensed electricians in your area with reviews and ratings.
- Ask for Recommendations: Talk to friends, neighbors, or local contractors who have had similar work done. Personal referrals are often the most reliable.
- Check Local Electrical Contractors: Many areas have electrical contractor associations that list qualified professionals. For example, in Northern Virginia, Root Electric is known for its expertise in sub panel installations.
- Verify Credentials: Ensure the electrician is licensed, insured, and familiar with local codes. Ask about their experience with 200amp panels specifically.
- Request a Consultation: Most electricians offer free or low-cost consultations to assess your needs and provide a quote. Use this to gauge their professionalism and knowledge.
For example, a homeowner in Charlotte, NC, found a great electrician through Google reviews. The electrician, Bobby from LiveWire Electrical, completed a 200amp sub panel installation for an EV charger in just 5 hours, earning a 5-star review for his responsiveness and clean work.
Future Trends in Sub Panel Installation
As homes become more energy-intensive, sub panel installations for 200amp electrical panels are evolving. Here are some trends to watch:
- Smart Sub Panels: Companies like SPAN are developing intelligent electrical panels that allow remote monitoring and energy management. These could make sub panels more efficient and user-friendly.
- EV Charging Integration: With electric vehicles becoming more common, sub panels are increasingly used to support Level 2 chargers, which require dedicated 50amp circuits.
- Energy Efficiency Rebates: Some states offer rebates for upgrading electrical systems, including sub panel installations, to improve energy efficiency. Check with your local utility company for programs like the Energy Efficient Home Improvement Credit.
- Increased Demand for 200amp Panels: As homes adopt more high-powered devices, 200amp panels are becoming the minimum standard, making sub panels a common addition for expanding capacity.
These trends highlight the importance of planning your sub panel installation with future needs in mind.
Conclusion
A sub panel installation for 200amp electrical panels is a smart investment for homeowners looking to expand their electrical capacity, improve safety, and prepare for modern energy demands. Whether you’re powering a new addition, a workshop, or an EV charger, a sub panel can make your home more versatile and efficient. By hiring a licensed electrician, obtaining the necessary permits, and following NEC guidelines, you can ensure a safe, code-compliant installation that adds value to your home.
The key is to work with a qualified professional who understands your needs and local regulations. Get multiple quotes, plan for future expansion, and prioritize safety to make the most of your investment. With the right approach, a sub panel installation for 200amp electrical panels can transform your home’s electrical system, giving you peace of mind and the power to support your lifestyle.
If you’re ready to explore a sub panel installation, contact a local electrician today for a consultation. They’ll guide you through the process, from load calculations to final inspection, ensuring your home is ready for whatever electrical challenges come next.
Leave A Comment